Semi-trucks are perhaps one of the greatest innovations in the trucking industry. These powerful vehicles have a far more complex build than straight trucks. For example, class-8 semi-trucks come with powerful 6 or 8-cylinder engines producing over 560 horsepower and 1,850 pounds of torque.
They also feature a complex transmission system with 10 forward and 2 reverse gears. A semi-truck is built with a rigid, tractor-like body featuring a sleeper cab, a dual vertical exhaust system installed at the front, and a fifth wheel at its rear.
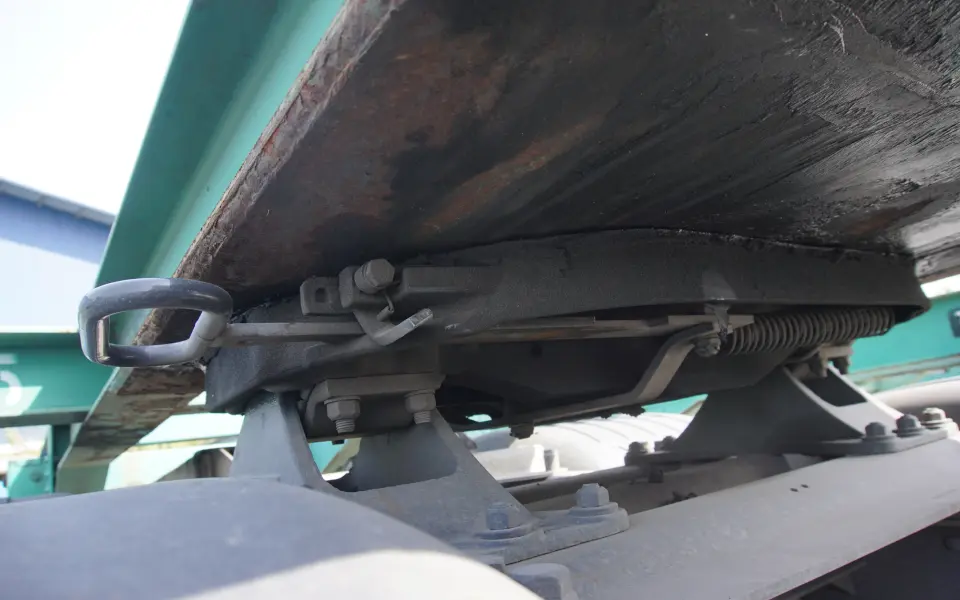
A fifth wheel is one of the most important parts of a semi-truck and is used to hook up a trailer. It is essentially a U-shaped coupling device made of steel and is located on the back of the semi. It connects with the trailer’s coupling kingpin so it can be moved as a single unit.
In this article, we’ll explain the functions of a fifth wheel in detail and share everything you need to know about how they work, the different types, how much they cost, and how to replace them.
The Function of a Fifth Wheel
The fifth wheel was invented in 1915 by US inventor Charles H. Martin, founder of Martin Rocking Fifth Wheel Co., as a hitch attachment to add to the truck’s bed. It enabled trucks and other types of vehicles to connect to a variety of trailer attachments, in order to transport large amounts of cargo efficiently and safely.
As the fifth wheel isn’t connected to the front axles, it allows the truck to move freely as it distributes the load more evenly over the frame by locking into the trailer’s kingpin from the bottom.
Types of Fifth Wheels
There are two types of fifth wheels – fixed and adjustable/sliding. Both types offer different benefits to users, as explained below:
Fixed
As the name suggests, a fixed or stationary fifth wheel is bolted in a fixed position on a semi-truck’s frame. Therefore, it cannot be moved forward or backward along the frame rails.
Fixed fifth wheels are suitable for hauling cargo with consistent loads with little or no weight changes. Hence, most cargo companies use this for full truckloads since they don’t need to adjust where the fifth wheel sits every time they load or unload cargo.
Adjustable
Adjustable or sliding fifth wheels come with a lever designed to release locks and allow trailers to slide forward and backward, enabling uniform weight distribution. Hence, they’re the go-to choice for trucking companies looking to haul different loads with changing weights and volumes.
How Fifth Wheels Work & How They Couple with Trailers
Fundamentally, a fifth wheel is merely a connection point between a semi-truck and a trailer made of components, such as the locking and release handle, locking jaw & bar, and a top plate.
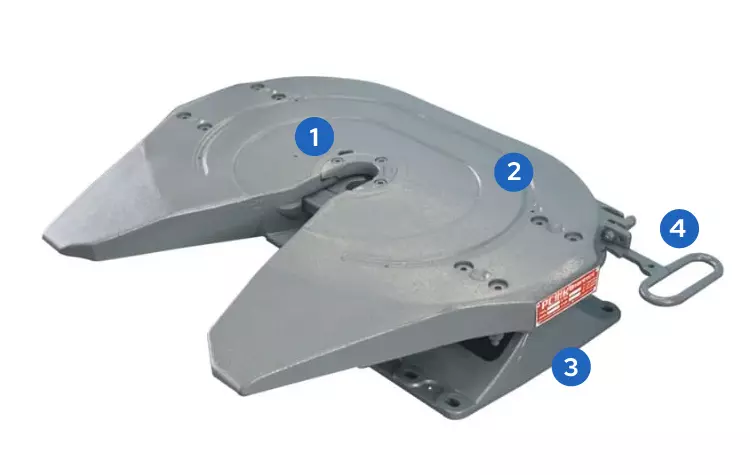
Fifth Wheel Components
- Locking Jaw
- Top Plate
- Pedestal
- Locking Handle
All these components combine to enable semi-trucks to connect with a trailer. This happens as explained below:
Coupling
The first step in coupling involves inspecting the fifth wheel and the trailer, checking for any damages (cracks, holes, bent kingpin, or similar) or missing parts (bolts, lever, etc.).
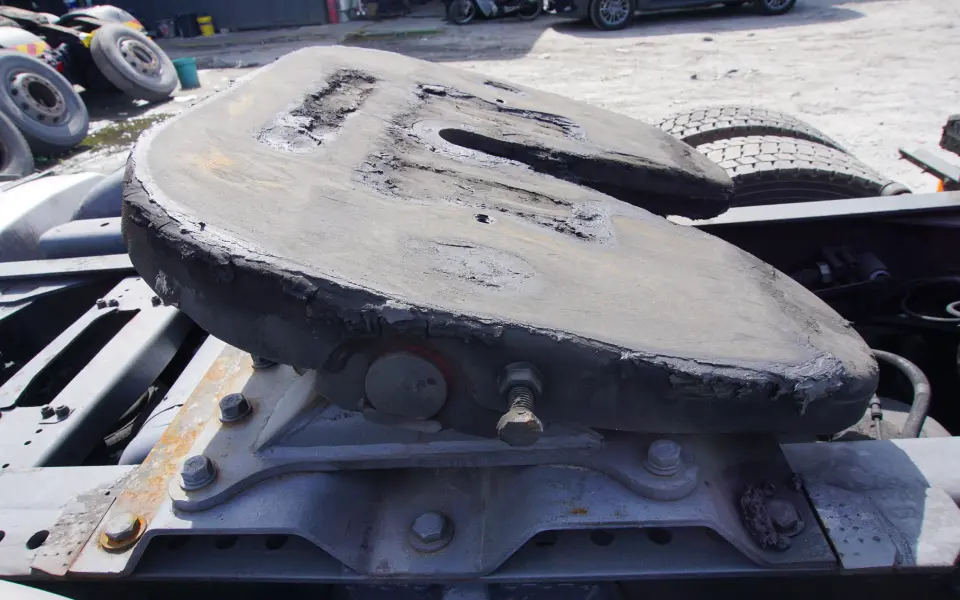
Once that is completed, grease is applied to the top plate to minimize friction-induced wear and tear and prevent steering problems. The fifth wheel also needs to be ready for coupling through the opening of the jaws, unlocking the handle, and tilting the plate towards the tractor’s rear.
Once the wheel inspection is complete, the coupling site needs to be free of any vehicles. The trailer should also remain stationary through the use of tire chocks or spring brakes. If there’s cargo inside, it needs to be secured.
Then, the semi-truck is positioned in front of the trailer and slowly reversed until the fifth wheel’s jaw touches the trailer and the kingpin is aligned. Before exiting the truck, it needs to be put in a neutral transmission and parking brakes need to be applied.
The final step before the coupling is to make sure the trailer sits at an optimal height (it should not be too low or too high). Lastly, the airlines (hoses) and electrical cables from the semi are connected to the trailer.
Uncoupling
While the majority of the uncoupling process may seem like coupling in reverse, there are a few steps and precautions that are important to understand. When uncoupling, the truck and trailer need to be parked on a sturdy and level surface with the parking brake and neutral gear applied.
Next, the air supply needs to be turned off and water, dust, and debris should be cleaned before disconnecting the air hoses and electrical cables from the trailer.
Then, the landing gear is lowered and released from the fifth wheel’s locking jaw by raising the safety latch and pulling the release handle out. Once the trailer is detached, all that’s left to do is start the truck and move forward.
How Much Does a Fifth Wheel Cost?
A fifth wheel is one of the most important parts of a semi-truck, giving it the ability to hook up to various types of trailers. Compared to other semi-truck parts, it’s relatively inexpensive and is widely available in the market.
There are several manufacturers who sell and install high-quality fifth wheels including Jost International, Holland, Sampa, Simplex, and more. Moreover, you can also find fifth wheel spare parts, such as foot mounts, and release handles, among various others.
Below is a price list of fifth wheel plates and their parts in the market:
| Item | Price Range (USD) |
| Release Handle | $14 – $74 |
| Top Plate | $249 – $463 |
| Foot Mount | $479 – $1,199 |
| Lock Jaw | $15 – $48 |
| Lock Bar | $38 – $109 |
| Complete Fifth Wheel | $1,799 – $4,569 |
Why You Should Replace a Fifth Wheel on a Semi-Truck
Fifth wheel maintenance is one of the most important aspects of owning a semi-truck. The hitch attachment device is crucial for road safety since it connects and holds the truck and trailer.

However, like most truck parts, it’s susceptible to wear and tear and requires replacement from time to time. While there’s no standard timeline for its maintenance, most experienced truckers recommend inspecting it every three to six months.
Below are some of the main reasons you should replace a worn-out fifth wheel:
- Road Safety – Operating a truck with a trailer attached via a damaged or worn-out fifth wheel is a serious hazard. It can lead to uncoupling during transit, causing the semi-trailer to move uncontrollably and potentially hit other vehicles, damage properties (including roads), or even injure people. Therefore, they must be replaced once signs of cracks, dents, or forms of wear and tear are found during regular inspections.
- Cargo Protection – A worn-out fifth wheel may not always result in detachment. However, a loose lock or unstable plate can cause rough movements, which can damage the cargo you’re hauling. The cargo could also incur damage if the trailer uncouples and crashes into a vehicle, wall, or other hard surfaces due to sudden impact and momentum shift.
- Overall Truck Expense Reduction – Another important reason to replace damaged or worn fifth wheels or their parts is to protect your truck and trailers from unnecessary damage caused by friction or collisions. For instance, if your trailer’s kingpin is not secured, it will move in different directions and damage any surface or fifth wheel parts it comes in contact with.
- Driver Productivity – As explained earlier, coupling and uncoupling are complex tasks that are often time-consuming. Therefore, operating a semi-trailer with a worn-out fifth wheel lever or no hydraulics can make both processes more challenging and tedious than usual. Drivers would have to spend more time on coupling and uncoupling and may even have to drive at slower speeds. Both situations can affect their productivity, timelines, and pay.
How Do You Replace a Fifth Wheel?
If you’ve leased a semi-truck via a lease-to-own program, you can request your lessor to replace your fifth wheel once it’s worn out. Similarly, if you have recently bought the truck from a dealership or manufacturer, you can visit their authorized workshops to have it replaced while it is still within the warranty period.
However, if your situation requires you to replace your fifth wheel at your own expense, the task is fairly simple and doesn’t necessarily require professional support as long as you have the required tools and a good understanding of how to do it.
If you’re intrigued by this prospect, you can use our general step-by-step guide to replace your truck’s fifth wheel yourself. It is important to note that different fifth wheel manufacturers may have varied designs.
Therefore, we recommend you seek the manufacturer’s advice prior to attempting the replacement on your own.
Tools and Equipment
- Ratchet
- Socket Set
- Drill with Drill Bits
- Torque Wrench
- Gas Welding Kit
- Crescent Wrench
- Vice Grips
- Pry Bars
- Grinder
- Plier
- Screwdriver
- Hammer
Safety Equipment
- Gloves
- Goggles (Welding)
Step 1
Start by ensuring the jaw is in a closed position and all air hoses have been disconnected. Then, grab a screwdriver and place it on the bolts holding the top plate.
These bolts are located at the left and the right sockets supporting the fifth wheel. Use a hammer to knock the tabs to provide better accessibility and at the same time loosen the bolts.
Step 2
Next, remove the bolts and remove as much grease before firing up the torch to soften the metal in order to access the bracket pins. Make sure you wear safety goggles and gloves to protect yourself from burns.
Once done, use a screwdriver or any prying tool to remove the bolt casing so you can access the bracket pin. Some fifth wheels secure the bracket pin using a cotter pin on the inner end. In this case, using a plier to remove the cotter pin is best.
Step 3
The most tedious part of fifth wheel removal is extracting the bracket pin. For this, you’ll need a sledgehammer to knock it out slowly. We recommend getting an additional person to assist with this step.
Depending on the amount of corrosion or wear, the bracket pin might not come out intact. Instead, it will gradually break into smaller pieces. Alternatively, some bracket pins are removed by pulling them outwards instead. As such, use a small hammer to knock the pin from the inside to loosen it and pull it out.
Step 4
Once the hole is clear, use the large prying tool again to wedge between the chassis and the fifth wheel to lift it from the truck. Once the fifth wheel has come loose, use a forklift or a crane to remove the fifth wheel from the truck.
Before you proceed to install the new fifth wheel, grab a screwdriver and hammer to scrape off the bracket pin’s bushings from the hole. Once done, clean the area using a degreaser and use a pressure washer to remove as much dirt and debris as possible.
You can use a three-inch wire reel attached to a drill via an extension and remove rust and other debris from the bracket as well. Finish the cleanup by applying an anti-rust spray to slow down corrosion.
Step 5
To begin the installation of a new fifth wheel, you’ll need to add new bushings. For this step, you simply need to insert them into the bracket’s hole. However, this may be a challenging task to perform by hand as the bushings are usually tightly fitted into the bracket.
Using a wooden plank to avoid damaging the bushing, place it against the bushing and strike it with a hammer to slowly inch it into the bracket. Once completed, roll the new fifth wheel plate over the mounting points and check both sides to ensure it fits perfectly.
Step 6
Next, you need to grease the bracket pin and bushings before inserting the pin into the bracket. From there, all you have to do is use a hammer and screwdriver to knock the pin into alignment with the bolt holes if it is not yet aligned.
Place the bolt casing and bolts through the aligned holes and use a torque wrench to tighten the new bolts. Make sure you tighten the bolt tabs to hold the pin in place. You can use a heel bar for this purpose.
Important Note: Before coupling the new fifth wheel to your trailer, make sure you grease the jaws, pins, top plate, and every other part of the structure to minimize corrosion.
Best Practices to Keep Your Fifth Wheel in Good Condition
Most experienced truckers look for different ways to reduce their long-term trucking expenses. Prolonging your fifth wheel’s lifespan can help you save thousands of dollars every year. Below are some of the best practices you can adopt to minimize damage, repairs, and replacements:
- Grease Your Fifth Wheel – Lubricating your fifth wheel using grease can reduce friction and minimize wear and tear in the locking jaw, the trailer’s kingpin, and other parts. Ideally, you should apply grease after every 2-4 months or 25,000 – 35,000 miles, depending on the road conditions. Moreover, before greasing the fifth wheel again, make sure you degrease it first to check for any damage or rust.
- Ensure That the Kingpin Is Secure – Always make sure that the kingpin is secured when inspecting the fifth wheel’s lockjaw right after coupling. A loose kingpin can accelerate wear and tear by causing excessive chucking.
- Tug Test Before Moving – A trailer tug test is the most important test for checking if your trailer is connected correctly to the semi-truck. It simply involves moving the connected truck slowly while leaving the trailer brakes engaged to feel the resistance on the fifth wheel. By performing this step, you are able to assess your truck’s mobility and identify if all parts of your fifth wheel are working well, especially parts that are hidden or difficult to inspect.
- Check Hydraulics Regularly – Another way to improve your fifth wheel’s lifespan is to inspect and maintain its hydraulics regularly. The best way to do this is by changing the fluids every 1,000 hours, depending on how often your couple or uncouple trailers. Moreover, you should also inspect the pumps and cylinders for any leaks and fix them proactively.
- Couple or Uncouple Slowly – Coupling and uncoupling are complex processes that require a fair amount of precision. The last thing you want to do is make a mistake and damage your trailer and fifth wheel by rushing into it. We recommend you take your time when performing these activities.